Find out how the Visitor Timelines module can help you manage the visitor experience.
What are visitor timelines? #
The Visitor Timelines module is an optional module that helps you to set up are a series of events or steps that visitors follow while on-site. This can be useful if you are managing events and visitors will be at different places on-site throughout the day. You can set different timelines for different types of visitor.
Activate the Visitor Timelines module #
The Visitor Timelines module is an optional paid add-on. The status of the module is shown on the System Settings > General page. It is shown as Active if it is available on your VisitorBook system.
You may have purchased this module at the same time you purchased your basic subscription. If you would like to activate this module during your subscription, please get in touch at support@libresoft.co.uk.

Features of the Visitor Timelines module #
The Visitor Timelines module enables you to:
- Create and edit visitor timelines.
- Assign timelines to a particular type of visitor.
- Sign off that a visitor has completed a particular step in the timeline.
- View a visitor’s progress on their timeline.
Important:
- Both the VisitorBook Admin Portal and the VisitorBook app on a terminal are used to manage visitor timelines.
- The terminal must be set up as a Staff terminal to access the timelines feature.
- Timelines are not visible to visitors.
Learn more: What is a staff terminal?
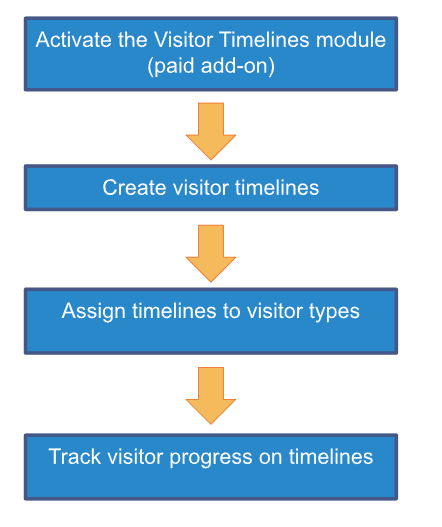
Create a visitor timeline #
There are two steps to creating timelines: adding a timeline and adding steps to the timeline.
To add a new timeline:
- Log into your VisitorBook Admin Portal.
- Go to User Settings > Timelines. The system opens up the Timelines page.
- Click the Add Timeline button.
- The system opens up the Add Timeline popup.
- Type in the Name of the timeline – the slug auto-populates as you type.
- Click the Add button. The new timeline is added without timeline steps.


To add timeline steps:
- Next to the new timeline you have created, click the Edit Steps button.
- The system opens up the Timelines page for the specific timeline. This page is blank initially.
- Click the Add Step button.
- The system opens the Add Step popup.
- Type a name for the step – as before, the slug auto-populates.
- Click the Add button.
- The step is added to the page. Continue until you have added all the required steps.
Tips:
- Timeline steps should be clear and concise.
- Want timelines with similar steps? Save time by clicking the Duplicate Timeline button.
- Slugs are auto-generated and used for API functionality (communication between software programmes).
Note: Some of the functionality in the images below relates to optional modules and may not be present on your VisitorBook system.


Navigate back to the User Settings > Timelines page to see the assigned steps. These will also appear on the app on a Staff Terminal to manage visitor timelines.
Important: You must close and restart the VisitorBook app on all staff terminals to display the new timeline in the app.

Edit a visitor timeline #
From the User Settings > Timelines page, you can edit the timeline name (changes autosave).
If you need to adjust the timeline steps:
Click on the Edit Steps button. The system opens up the page where you added the steps. From here you can:
- Change the name of the step (changes autosave).
- Toggle a step to make it optional.
- Adjust the order of the steps.
- Delete a step by clicking on the Bin icon.
Important:
- You must close and restart the app on all sign-in devices to apply any changes to timelines.
- Timelines already used (a visitor of a particular visitor type linked to a timeline has signed in) cannot be edited. If you want to adjust this timeline, you will first need to duplicate it. Then edit the duplicated timeline.
Assign a timeline to a visitor type #
Once you have created a timeline, you can assign it to a particular visitor type.
- Log into your VisitorBook Admin Portal.
- Navigate to User Settings > Visitor Types. The system opens up the Visitor Types page.
- On your selected visitor type, in the Timeline column, select the timeline from the dropdown list.
Important:
- You must have created the timeline before assigning it to a visitor type.
- The timeline will apply to all visitors who sign into VisitorBook under that particular visitor type.

Track visitor progress on timelines #
You can mark specific steps in a visitor timeline as complete on the VisitorBook app on a Staff Terminal.
Important: Timelines will first need to be set up and assigned to visitors in the Admin Portal.
To track visitor progress on a timeline:
- Open the VisitorBook app on a staff terminal.
- Tap Staff. The app opens up the Staff actions page.
- Tap the Timeline Steps button.
- The app opens the Complete Timeline Step page, which displays all available timelines.
- Scroll to the correct timeline for the specific visitor.
- Tap the step in the timeline that is complete.
- Scan the visitor QR code (this is on the printed visitor label).
- The timeline step is marked as complete and updated on the Admin Portal on the People Onsite page.


Timelines and the Assets module #
If you have both the optional Visitor Timelines and Assets modules on your VisitorBook system, you can tie in timelines with asset loans.
The first step is to link an asset to a specific timeline step. To do this:
- Go to User Settings > Timelines.
- Find the timeline you wish to link with assets.
- Click the View Steps button to open up the detailed steps for that timeline.
- On the relevant step, in the Loan Trigger column, select an asset type from the dropdown list.
The second step is to assign a specific asset of that same type to a visitor. This is managed via the VisitorBook app on a staff terminal, using the QR codes printed for both visitors and assets. Once you’ve loaned the asset, this automatically updates the timeline step for the visitor.
In the example shown in the images below, Maya signs in as a visitor to attend an event. One timeline step for that event is a factory tour, for which visitors are loaned safety vests and googles. In the Admin Portal, safety vests and assets are added as loan triggers for the Factory Tour step. When the tour begins, a staff member loans a safety vest to Maya via the VisitorBook app on a staff terminal. This automatically updates the timeline shown for Maya in the Admin Portal.
Important:
- Loan triggers are only available if the optional Assets module is activated on your system.
- Loan triggers relate to asset types, not specific assets grouped within that asset type.
Note: You can add more than one asset as a loan trigger for a particular step. However, the timeline is updated when only one of those assets is loaned.


© Libresoft 2025